Some of the more advanced cameras these days come with the TILT SHIFT effect feature. This is a specialized feature in rendering photographs that make certain objects in the image look like they were miniature figures or objects. These images are perfect for
catalog printing, sometimes
brochure printing or even your blog.
In this tutorial, we will tell you how you can do the same effect using Adobe Photoshop. So even if you do not have a hi-tech camera, you can also achieve that Tilt Shift effect for the different images that you have. So just follow these instructions and learn how to do it.
1. Initially of course you will be choosing an image. When you are choosing an image for this tilt shift effect, it would be better for you to choose something that is taken from a high vantage point looking down. This is essential as this is how naturally most people see miniatures. It would be harder to project the illusion of false miniatures if you do not use an image composed this way. So for this example, we are using this image that is looking downwards towards our subjects.

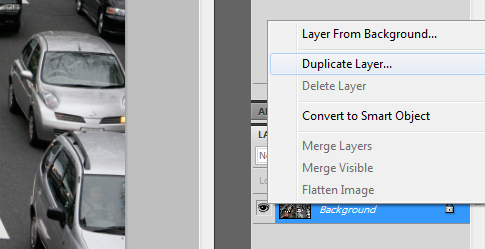
2. Now, once you load this image in Photoshop, make sure you duplicate it first. This gives you the background as your backup just in case you mess up the effects that we are about to do. If you do make a mistake, simply duplicate this base background we copied from and start over. To duplicate the background, simply right click on it and select Duplicate layer...
3. With our duplicate layer selected, click on the Quick Mask mode icon below the foreground/background color selection area. Afterward, make sure that your foreground and background colors are Black and white respectively.

4. Next, select the gradient tool and apply the horizontal gradient effect where your white is at the center whilst it goes on to black going upwards and downwards.

5. Now, with the gradient tool selected, drag your cursor to the canvass and draw the gradient. Remember that the center of the gradient will be where your target objects are, so apply the gradient tool appropriately. It is best not to go too vertical to make things slightly more natural.

6. Once you have selected the right focus for your image, press the Quick Mask Icon again or press the shortcut (Q). Afterwards, press SHIFT+CTRL+I to select the top and bottom areas of our image (if these were not the ones selected).

7. Now, we will be adding a lens blur on the top and at the bottom of our image to get the miniature effect. Just go to Effects -> Blur -> Lens Blur to apply this blurring filter.

8. The trick is to use a high radius value as well as a high threshold value as detailed above. Just adjust and refine the settings if you think the values above are too much for your image. Make sure to tick the preview checkbox above so that you can see the effect easily.

9. Once applied, you should see our Tilt Shift effect come to life.
10. As a final retouch we will want to adjust the colours and brightness so that the figures look a bit like plastic objects. To do this, go to Image -> Adjustments -> Curves...

11. Use an output approximately around 150 and an input of around 100 OR just shape the curve almost like the one you see above.
12. Afterwards, you should get our final Miniaturized product, simulating the Tilt Shift effect on other cameras.


 Linear Mode


