Navigation:   Home  >>  Forums

Go Back   Photoshopchop.com > HOW TO'S > TUTORIALS

Notices

TUTORIALS The best place around to find some good tips and tricks from the members of PSC.

Reply
 
Thread Tools Display Modes
Old 08-11-2009, 01:22 AM   #1
mglavina
Moderator
 
mglavina's Avatar
 
Join Date: Feb 2007
Location: Your bedroom closet
Posts: 1,457
mglavina is on a distinguished road
Default Window Tinting - The Right Way

Once again just like my Clear Lights Tutorial, I've noticed that a lot of choppers have been darkening there windows and just leaving it at that for a tint job. In reality when a portion of glass becomes darker, the reflections becomes deeper and more visible. I decided to put together another short tutorial to show how to make more realistic tinted windows.

1)For this tut, I have chosen the european Mazda 6 MPS for my base.
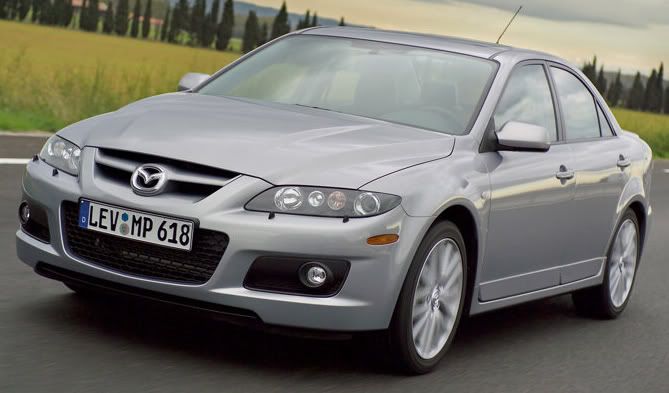

2)First step is to grab the the Polygonal Lasso Tool (L) and make a selection of the windows. Ensure that you only select the windows, don't get lazy and select over the pillars or window wipers lol.
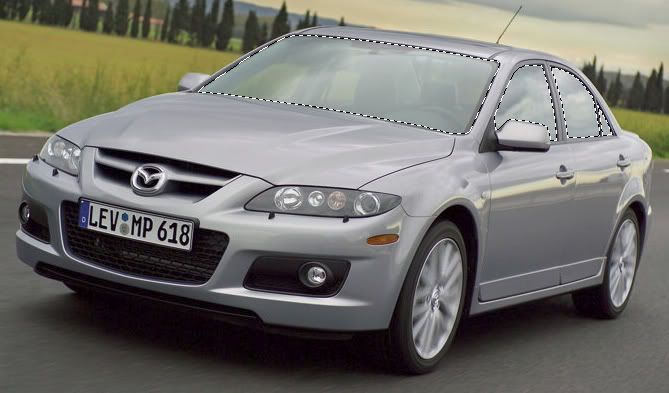

3)With your windows now selected, make a new layer from the layers menu. With the selection still selected, grab the paint bucket tool (G) and fill the selection on your new layer completely black. You can deselct the new layer once it is filled (Ctrl + D). Name this new layer "windows" to avoid future confusion.
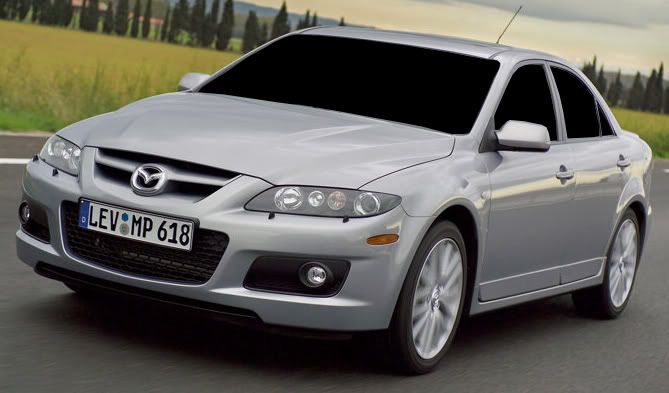

4)Now, on your "windows" layer, decrease the Opacity to about 50%. This is only a basic guideline, in some cases you may have to decrease it to 35% depending on the lighting sources on the original photo. Of cource, you always have to play around with it and I am just including the settings I used for the tutorial.
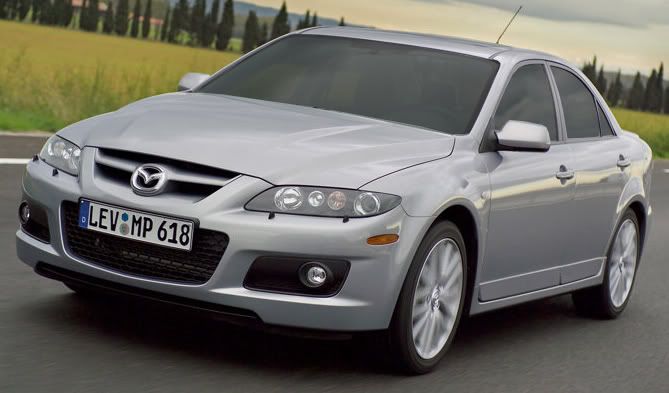
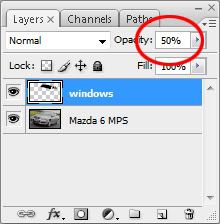
5)Think your done now? Well guess what your not, the fun stuff comes now . Turn off your windows layer by pressing the "eye" icon that's next to the layer title in the layers menu and take a closer look at your original windows. Notice the reflections and highlights. Your next step is to create your own reflections ontop of your chopped windows layer. You don't have to add these stress lines in but they will help. I only included them to be more specific on what I'm trying to explain.
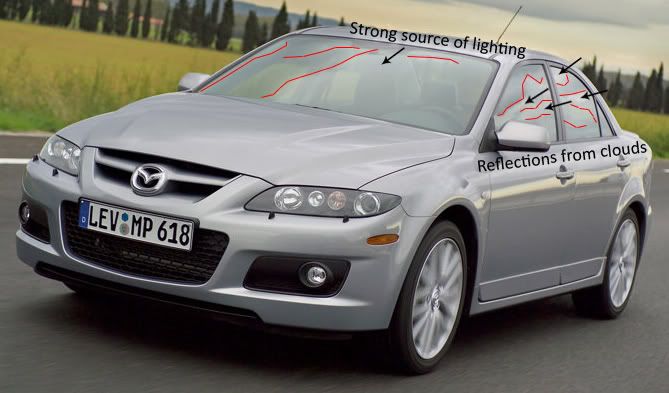

6)Now, create another new layer on top of your windows layer and name it "reflections". You will now add your own reflections. In this case, the only main reflections are coming from the sky and clouds which can be easily brushed in. On more difficult photos with advanced scenary you would have to take selections from buildings and other surrounding objects to reflect in the windows.

You can now turn on your windows layer, but working in the reflections layer grab the Brush Tool (B) and select a soft round brush at a medium size. I used a 65 pixel diamater for this photo. Lower the opacity of the brush to about 10% and select white for the color. Taking your time and making even strokes begin adding a light layer of white on top of your windows where the original reflections were. You can adjust the brush to make it smaller for more difficult areas. You can also deselect sections of the windows to add a gradient like light coming from only 1 direction.

With some time and patience here is what I came up with:
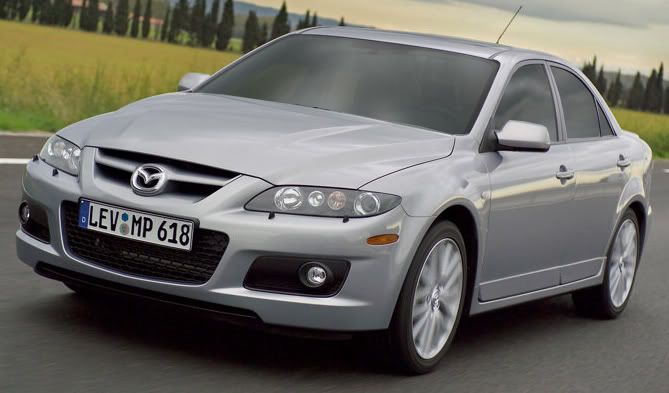

It should look a lot better then just simply making the windows darker. Compare this example to the one without the highlights and you notice a huge difference. I hope this helped .
__________________

The First PSC Video | Battle Rules | PM Me
mglavina is offline   Reply With Quote
Old 08-28-2009, 01:47 AM   #2
mglavina
Moderator
 
mglavina's Avatar
 
Join Date: Feb 2007
Location: Your bedroom closet
Posts: 1,457
mglavina is on a distinguished road
Default

Another example but this time with a few additional reflections to the highlights.

Stock


Darker


Darker with highlights and reflections


Again, hope this helps .
__________________

The First PSC Video | Battle Rules | PM Me
mglavina is offline   Reply With Quote
Old 09-07-2009, 11:15 AM   #3
mglavina
Moderator
 
mglavina's Avatar
 
Join Date: Feb 2007
Location: Your bedroom closet
Posts: 1,457
mglavina is on a distinguished road
Default

Getting close to 200 views without any comments. Has it been helping? Has anyone tried it? Is there not enough detail or is too confusing?
__________________

The First PSC Video | Battle Rules | PM Me
mglavina is offline   Reply With Quote
Reply

Thread Tools
Display Modes

Posting Rules
You may not post new threads
You may not post replies
You may not post attachments
You may not edit your posts

BB code is On
Smilies are On
[IMG] code is On
HTML code is Off

Forum Jump


IBM QRadar xx29 Server 4412Q2A picture

IBM QRadar xx29 Server 4412Q2A

$200.00


IBM Power 720 POWER7 00E6516 3.6GHz CPU 64GB RAM Server  picture

IBM Power 720 POWER7 00E6516 3.6GHz CPU 64GB RAM Server

$209.98


IBM 7944AC1 System x3550 M3 Server 1*Intel Xeon X5650 2.67GHz 4GB SEE NOTES picture

IBM 7944AC1 System x3550 M3 Server 1*Intel Xeon X5650 2.67GHz 4GB SEE NOTES

$27.25


IBM SYSTEM x3200 M2 Server - HDD wiped, No OS picture

IBM SYSTEM x3200 M2 Server - HDD wiped, No OS

$75.00


IBM Power S822 12-Bay Server System Power8 Core 3.42Ghz DVD-Rom Drive 64GB No HD picture

IBM Power S822 12-Bay Server System Power8 Core 3.42Ghz DVD-Rom Drive 64GB No HD

$399.99


IBM Power S822 8284-22A 12SFF Power8 3.89GHz 6-Core 64GB RAM No Bezel/HDD Server picture

IBM Power S822 8284-22A 12SFF Power8 3.89GHz 6-Core 64GB RAM No Bezel/HDD Server

$359.99


IBM x3650 M4 Server 8-Bay 2.5

IBM x3650 M4 Server 8-Bay 2.5" SAS/SATA HDD Hard Drive Backplane Board 94Y7751

$11.79


IBM Lenovo X3650 M5 2U 8x 2.5” CTO Rack Server – 2x HS, 2x 750W picture

IBM Lenovo X3650 M5 2U 8x 2.5” CTO Rack Server – 2x HS, 2x 750W

$199.00


IBM 8203 E4A p520 Server 8203-E4A 4.2GHz 2-Core POWER6 32GB RAM / NO HDD USED picture

IBM 8203 E4A p520 Server 8203-E4A 4.2GHz 2-Core POWER6 32GB RAM / NO HDD USED

$109.99


IBM System X 3250 M5 Single Xeon Quad Core E3-1220 v3 @3.1GHz,8GB RAM,Linux SUSE picture

IBM System X 3250 M5 Single Xeon Quad Core E3-1220 v3 @3.1GHz,8GB RAM,Linux SUSE

$199.87


All times are GMT -4. The time now is 07:22 AM.


Powered by vBulletin® Version 3.8.8
Copyright ©2000 - 2024, vBulletin Solutions, Inc.
All rights reserved 2002-2008 Photoshopchop.com